
You’re probably wondering:
“How to use a Masterbuilt electric smoker.”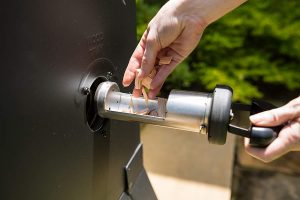
Using this piece of cooking equipment will help you realize how conveniently you can make smoked food.
If you’re looking to have a step by step guide on this matter, then you’re in the right place. You can buy one that will be a great deal, either for home or commercial use.
Check Latest Price & details of all masterbuilt electric smoker on Amazon
It’s safe to use because you don’t have any risks of sparks, flare-ups, or risks associated with propane. It’s also easy to clean, as there is no ash or charcoal residue to clean up.
Besides, an electric smoker is extremely energy efficient and its insulation prevents much heat loss.
Now:
Using an electric smoker may feel like a hassle to you. But, once you’ve used it, you won’t need to look back.
You can cook meats at low temperatures for a long time without overcooking results.
You may have heard that:
Cooking with a masterbuilt electric smoker has a ton of advantages. Here are just a few reasons why an electric smoker can be an excellent choice.
At the end of this article, I’ve also provided some useful ways to clean your smoker if you’re a beginner in smoking.
Let’s get started!
Table of Contents
Using a Masterbuilt Electric Smoker: Step by Step Guide
When you’re going to use a masterbuilt electric smoker, you need to follow masterbuilt electric smoker instructions. Otherwise, you cannot achieve desired outcomes from this handy cooking equipment.
So, let’s follow these easy steps to make your food more delicious.
Season Your Smoker for First Time Use
Seasoning the masterbuilt electric smoker is essential when you’re using it for the first time. As compared to a charcoal smoker, the right way to do this is different.
You have to make sure that you burn off all the oil, dust, or other manufacturing substances on the smoker.
Don’t use machine oil, yet follow these steps instead.
You should put all the smoker equipment in the proper place. You also need to make sure that there is no water in the pan.
When you’re starting seasoning the smoker, at first, plug the smoker into your nearest socket. Press the power button to turn it on, and it will automatically start when it gets electricity.
You need to set the temperature to 275 degrees Fahrenheit for 180 minutes (three hours).
Next, put half a cup of wood chips when only 45 minutes is left for finishing off the pre-seasoning process.
Once the timer has finished off, switch the smoker off to let it cook down.
You and your smoker are now ready to go for cooking food for the first time.
If you clean your racks by hand, that will also be excellent for you. But, the process I’ve mentioned just now saves your effort and time so much.
Prepare Your Meat
The way you get your meat ready will entirely depend on which recipe you’re going to cook. It’s because different recipes need a variety of ingredients and marinating times.
I recommend you marinate your meat for at least a few hours, so the meat soaks up the marinade and give excellent flavors. I usually do it overnight for the best results.
Set the Right Temperature
Setting up an accurate temperature is an excellent thing for cooking something on a smoker. If you don’t maintain the right temperature, you may not get the exciting flavors.
To get the perfect result, the accurate temperature should be 225 degrees Fahrenheit, especially when cooking fish and meat.
So, be careful!
Add More Wood Chips
You may have already put some wood chips for 45 minutes. If they have stopped producing smoke, add more wood chips (only half a cup at a time) to continue smoking over your food.
It’s because you shouldn’t overdose the smoker with wood chips. The overall process can be badly affected.
So, pay attention to it!
Refill the Smoker’s Water Pan
Refilling the smoker’s water pan is essential because the water turns to steam and helps in keeping the meat moist throughout the smoking period.
So, add some water to the water pan according to the instruction manual. The right amount of water may vary depending on a variety of models in the market.
Place Your Meat on the Grill Trays of the Smoker
When the smoker produces a sufficient amount of smoke, you can now put the meat into the smoker. Make sure that your meat is on the top of the grill trays.
Once you’ve put the meat into the smoker, shut the door of the smoker off for cooking the meat for a certain period.
Baste the Meat
The cooking time of the meat mainly depends on three vital factors:
- The size of the meat
- The thickness of the meat
- The required temperature for cooking
If you want to keep your meat moist, baste it after cooking it approximately two-thirds of the time.
For example:
You may cook a particular kind of meat that probably needs three hours to prepare. So, when two hours of cooking have been finished off, you need to baste it around.
Provide More Wood Chips Throughout the Cooking
If you’re looking to get an excellent smoking experience, you’ll need to keep observing the level of wood chips frequently. Put only half a cup of wood chips at a time (as mentioned earlier) if necessary.
You don’t need to worry!!
Once you notice that temperature is rising because of putting more wood chips, take it as normal.
After some time, the temperature will go back to the original condition. So, you need not fix it manually.
Put Some Sauce on the Meat
I believe you may not dislike taking some extra delicious sauce on your meat.
Before 45 minutes of taking the meat out of the smoker, you can put a tasty barbecue sauce or any other sauce as your requirements.
The sauce will not only increase the taste of your meat but also prepare it to eat soon after taking it out of the smoker.
Although this step is additional and you can skip it, I think this is essential to enhance the taste of your food.
Remove the Meat from the Smoker and Serve
Here’s the deal:
Your meal is now ready to eat!
Take it out of the smoker and share it with your family and friends. And remember you have to clean the smoker.
Turn the smoker off to Allow it to Cool Down
You have done it!
I think you’ve already realized that using an electric smoker is easy.
When you’re enjoying the barbecue party, switch the smoker off to let it cool down.
It’s not too hard, is it?
Keep in mind that allowing the smoker to cook down is essential before cleaning it.
Clean it up
“How to Clean a Masterbuilt Electric Smoker”?
Don’t get exhausted!
After completing all the things, consequently, clean the smoker accurately so that you can use it for the next time without feeling any hassle. Otherwise, it might be tough for you to clean it twice.
You may still be wondering:
“How to Clean a Masterbuilt Electric Smoker”?
Don’t worry!
I’ve come out with some instructions that you should follow to clean yours.
- Clean the smoking rack, water bowl, drip pan, and grates
- Wash all the dirt and food particles using detergents
- Remove the wood chips by shaking the tray
- Clear out the ash with any brush (a paintbrush would be suitable)
- Make sure that ash and wood chips have cooled down before removing them
- Use a slightly wet cloth to clean the interior of the smoker
- Wipe the seal of the inner door properly for using the next time
Before jump to Conclusion you can get our another article how to use a smoker grill combo.
Conclusion
Hopefully, I’m successful in providing you with some useful insights on how to use and clean your masterbuilt electric smoker.
Now:
You know the right information on using a masterbuilt electric smoker.
You need to keep the manual in a safe place so that you can read it whenever you find any issue or you need any help.
If you haven’t purchased a masterbuilt electric smoker yet, don’t worry. A good quality masterbuilt electric smoker comes at a reasonable price in any marketplace, especially in Amazon.
Check Latest Price & details of all masterbuilt electric smoker on Amazon
Have a good luck!


[…] is a temperature gauge on the outside of the smoker that lets you know the exact temperature inside. You can keep the heat under control very […]